Good
Ways of Blowing up NPN Transistorized Controllers
(and How to Avoid them)
Updated December 2013
1) Shorting Out The Tapes
Another how it works question,,,, what happens if there's a short circuit across the motor (e.g. the chassis shorts out the tapes)?
Answer - The transistor tries to
provide more current to compensate. A short circuit could well force 100
amps through the transistor, or provide 300 + watts of
heating. OK, maybe 99 times out of a hundred it won't be that bad - but
you don't want a blown transistor on the hundredth time!
As far as I can establish, some imported controllers with NPN circuits
have transistors rated to deal with this. However, the suppliers don't
usually disclose what they are using, commonly removing the transistor
number from the can, so I cannot be sure exactly which
controller has what rating.
What does this mean?
Answer - If you get a good solid
short, the transistor your transistor might fail - you might get away with instantaneous shorts,
but these could cause some damage to the transistor which will cause odd
characteristics and perhaps failure next time the transistor gets a little warmer
than normal.
You might get away without problems but better safe than sorry!
How do you get round this problem?
Answer - Put some sellotape or varnish on the bottom of you cars so they don't short out the tapes. Always unplug your controller (or at the very least don't press it) when somebody is putting the tapes down - if they are using something solid and metal it will produce a very good short circuit. If you are repairing the tapes please take a care to warn the driver! (Quite apart from any controller damage, it'll stop them driving their cars into you!)
2) Other Good Ways of Producing Short Circuits
Something which has always surprised me is that lots of transistors are bolted direct to the heatsink so the whole of the metalwork is connected to the collector terminal - the tape + on the track. This is all very well as long as it doesn't come into contact with (for example) the negative tape , the brake terminal on a controller plugged into the next lane or the fixing screw of a controller socket*. This sort of thing causes the transistor to fail (often to dead short which will put your car straight into the wall). This is not a problem that occurs very often, but it could be prevented with a transistor mounting/insulating kit at a cost of a few pennies.
There is a small disadvantage to insulating the transistor. Electrical insulation will also increase the thermal resistance between the transistor and heat sink. This means that the transistor will run slightly hotter in order to transfer the same amount of heat. If you use heat sink compound and bolt down the transistor properly (do the screws up tight) the temperature difference should be small. Higher temperature = less reliability, if you think this small temperature rise due to insulation will make any difference I would recommend you fit a slightly larger heat sink and insulate the transistor - or better still a much larger heat sink and insulate the transistor.
* Modern controller sockets have the fixing screws connected to the E terminal (the negative power supply on a slot track).
3) Some Like It Hot!! (but your transistor doesn't)
How hot does it get - well this circuit produce just as much heat as a variable resistance controller (a diode controller also produces the same amount of heat). Transistors are easy to mount on heatsinks to get rid of heat ,,, and a good thing too because a controller resistor can run at much higher temperature without failure - also a controller resistor often starts to smell before it fails (so there is time to change before it blows or stinks out the clubroom) but a transistor will just fail. To avoid transistor failure you must stop it getting too hot - the only way to do that is to mount it on a big enough heat sink. As a rule of thumb (or finger?), if after a couple of minutes running the transistor is gently warm to the touch its OK - if it's hot to the touch (50 degrees or above) then a larger heat sink would help reliability and if its too hot to keep your finger on, (70 degrees C or above) then unplug it quick! - it either has a fault or it needs to get rid of more heat - try a larger heat sink or a fan. Transistor manufacturers typically recommend about 20% reduction in current if the case is running at 50 C and around 40% reduction at 75C . If you do need a bigger heat sink, probably the easiest way of getting something effective is to buy a larger heat sink from one of the electronics suppliers. These days a heat sinks intended for computer processors are widely available, and are very suitable. However heat sinks don't have to be a length of finned aluminum - anything that helps get rid of heat will do - the metal box bolted to the finned aluminum will increase it's effectiveness. Also some heat sink compound will help a little. Why can't I tell you what size heat sink you need? Well, the amount of heat a controller produces depends on many things, a big enough heat sink for all possible circumstances would be far too large for most people. Things which make controllers run hotter are;-
Inexperienced drivers,
Twisty Tracks with short
straights,
Lack of track knowledge,
Good power supplies and thick
track wiring,
Hot Motors ,
Poor car handling,
Controller faults
4) The Dirt Bits!
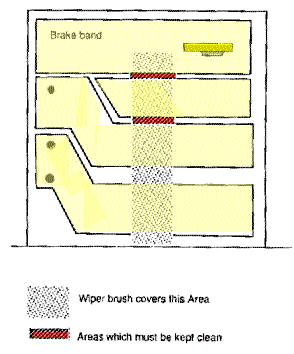
Probably the most frequent cause of transistor failure is tracking between the brake terminal and the top of the resistor contacts. This is caused by a conductive deposit on the contact board where the wiper runs - usually remains of the contact brush etc. Initially this causes the transistor to get warmer than normal (because it is partly switched on when the controller is on Brake), if not corrected this causes the transistor to get hotter until it fails. Many people have noticed the transistor getting warm and solved the problem by cleaning the tracking off the board before it causes a serious problem. The areas marked in red on the diagram are the important areas to clean.
You can
avoid this problem by cleaning the board every couple of months as a matter
of routine maintenance. Some controllers are very much more prone to this problem
than others. The deposit builds up much more quickly when copper/carbon brush
material is used as the wiper and it also depends on the gap between the brake
band and the top of the resistor. Incidentally, if you are wondering why this
was never a problem on variable resistance controllers (it shouldn't be a problem
on Diode controllers either), the answer is that the tracking probably does
occur, but the tiny currents that pass through the tracking are negligible to a
slot car motor - but they are multiplied to by the gain transistor. This tracking is less of a
problem with this circuit than the "normal British Darlington" circuit because
the single transistor only multiplies the tiny current by about 100 where as the
Darligton pair used in a "normal British" multiplies the tiny current
by 1000+.
Incidentally,
just checking the resistance of suspect tracking with a normal meter can give
misleading results. Tracking may pass no current at the very low voltages
meters use to measure resistance but pass significant
current it the sort of voltages present in the operating controller. I recently
found one controller that was blowing transistors - measuring the resistance of the tracking with a
normal meter
showed more than adequate insulation (over 2 megohms)
but when I put 10 volts across it the tracking was passing l0mA which is plenty
of current to switch on a transistor and cause heating problems.
The diagram above shows( in red) the area that needs to be kept clean
) the illustration is based on an SCD controller, but most other types
work in a similar way.)
5) A Bridge Too Far
Another problems that can cause transistor failures - not to mention damage to variable resistance controllers - is the wiper bridging the gap between the brake and the resistor (even momentarily). Make sure the wiper cannot touch the resistor contact and the brake at the sale time - it is much safer if there is some "Dead" wiper travel (that is after the wiper leaves the brake there should be some travel when it's not connected to anything before it makes contact with the resistor).
This circuit has two electrically isolated wipers / contacts connected to the trigger. Make sure they stay electrically isolated from each other.
Where controllers have separate brake contacts, power contacts, or full power relays make sure they work in the correct sequence. Generally this is how the should work (starting with the trigger / plunger in the fully released position)
| Step in the sequence | Notes |
| 1 The separate brake contact goes open circuit | |
| 2 The wiper leaves the brake contact | Some controllers have 1 or 2 but not both |
| 3 The separate wiper driving the transistor leaves the brake contact | |
| 4 The wiper driving the transistor makes contact with the top of the resistor chain | |
| 5 The wiper makes contact with the full power part of the wiper board | |
| 6 The power wiper makes contact | |
| 7 The separate full power contact makes contact | Some controllers have 6 or 7 but not both |
| 8 Full power microswitch turns on | Full power microswitchs are rare on this type of controller |
| 9 The full power relay cuts turns on | Relay not present in some controllers |
The controller must follow the sequence in reverse when releasing the trigger / plunger from the full power position Note microswitches and relays often don't release at the same point they make contact, so you need to check the sequence in both directions.
6) Track Wired Incorrectly
Transistors only pass current in one direction - if the track is wired to BSCRA standards (with the controller between the + side of the power supply and the track) the normal circuit works fine. If the track is wired incorrectly (with the controller between the negative side of the power supply and the track) your transistor will blow up. Incidentally, this has got nothing to do with wiring the car up to go forwards or backwards.
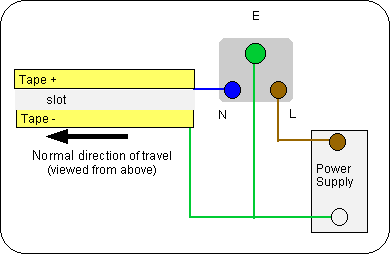 Correct
Track Wiring (updated to 2003 BSCRA Standards)
Correct
Track Wiring (updated to 2003 BSCRA Standards)
If you want a transistorized controller with the "NPN" circuit to work the other way round, a MJ14003 PNP transistors will work. As I've mentioned earlier, I haven't managed to find out what NPN transistors these manufacturers use, so I cannot comment on how similar this PNP equivalent is to the original transistor .
Some controllers (e.g. Pro 2 and Pro 3) have a diode connected to the transistor. The diode is reverse biased in normal operation (or to put it another way, no current flows through the diode when the controller is correctly connected.). The diode will provide some protection if the controller is connected up incorrectly, or it is plugged into an incorrectly wired track. In these incorrect conditions, the diodes can pass high currents, and these diodes have been known to fail. When they fail the controller is likely to give more or less full power all the time (even without pulling the trigger), much the same symptoms as some sorts of transistor failure. If the diode has failed, simply disconnecting one end of the diode will solve the problem but it will remove the protection against incorrect controller connection etc.
The replacement diode should be a schottky rectifier diode, I'll not recommend a particular type, most electronics suppliers have dozens of types rated at more than 20 amps and more than 40 volts. I haven't proved this, but it might improve reliability to go rather higher than 20 amp rating; there is little cost penalty in going to at least 40 amps. (If you are interested in an explanation of that, it is difficult to predict what peak current the diode will see for a short time in fault conditions, although 20 amp rectifier diodes are usually designed to take at least 100 amps peak current.)