page updated November 2023
Contents of this section
Link to previous page - The track surface
| TRACK CONSTRUCTION - Part 2 |
page updated November 2023 |
| Cutting The Slot | |
|
Contents of this section
Link to previous page - The track surface |
TRACK CONSTRUCTION Part 1 described how to build the surface of the track. Now for the vital matter of deciding what pickup to use and cutting the slot.
In some parts of this article I’ve suggested what sorts of tolerances are acceptable. Some people will tell you that the only way to do something right first time is to have done it before - that's one reason the professional track builders are so good! It can be a good idea to try routing a small test piece first, just to check everything is cutting properly. Naturally everybody thinks their track will be built right first time - this approach is quicker as well as better! However, I have suggested how some errors can be corrected - not as an invitation to bodgery - but recognizing that we all make mistakes from time to time.
I’m assuming that your club has enough practical skill to handle the power tools safely and do a reasonable carpentry job. I would hope it goes without saying, if you don’t know how to do a job safely DON’T DO IT!
Tape or Braid ?
The choice between using tape or braid for the pick-up conductors needs to be made before the surface is routed because braid needs a recess in the track surface. Braid is traditional on raceway type tracks and these days nearly all new club tracks are using braid. The main advantages of tape is its cheaper, easier to join for repair, and needs less machining of the track surface. The main advantages of braid is that it copes with temperature changes better (it can compress without coming up), it has less electrical resistance (so needs fewer power feeds). Many years ago when this article was originally written slot racing suppliers had suitable tape. Unfortunately the most suitable copper tape is pretty well unobtainable these days. Why? As a suppler put it - "Everybody uses braid these days, there's hardly any demand for tape so it's not worth me getting another batch made." Copper tape intended for glazing use is readily available, there are some reports of it being OK but is not really suitable for slot car tracks.
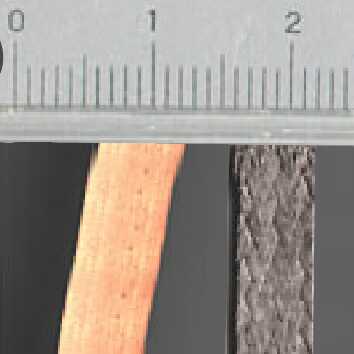 |
Tape or Braid? Copper tape (left) and track braid (right). As can be seen from the ruler, both are about 6mm wide. |
There is a further option particularly applicable to (Scalextric, etc.) cars with magnet traction - magnetic braid. Magnetic braid together with other ways of providing magnet traction is covered in a separate section.
Tape and braid is available from the usual slot racing suppliers. Tape usually comes in 100ft, (30m) rolls, braid usually comes in larger rolls. Laying the tape or braid is covered in TRACK CONSTRUCTION Part3.
The professional track builders use high power routers which can cut the slot in one, or at most two cuts. Some professionals use numerically controlled cutters, some professional quality equivalents of the routers sold to the DIY market. A cheap DIY type router will do the job, but you will need to take several cuts which will take rather longer. (and makes it more important to jig the slot position precisely, but if done properly this shouldn't be a problem.) Router prices now start at under £30. (A plunge router is best, nearly all diy routers are the plunge type) The cheap ones will do the job, but they are not as well made as the (much more expensive) professional routers, so you need to take care with the jigging as the cutter often isn't concentric with the circular bed. (You get what you pay for....) Most large towns have tool hire companies that will rent you a large router. If you are hiring a router, a little planning is advisable to keep the hiring period (and hiring cost) as low as possible. Check what type of router they have so you can get a suitable radius arm ready and the right shank size cutters. (Most routers take 1/4 inch shank cutters, and this is the standard size for cutters. Heavy duty routers may take 1/2 inch shank cutters. Its well worth checking the one you hire comes with the right size collet for your cutters!)
As with all power tools its important to read, understand and follow all the safety instructions. If you don’t know what you are doing don’t do it!
A router is necessary to cut the slot in the
track surface. Slot Width British (BSCRA) rules require a slot width between 3 and 5 mm wide,
International (ISRA) rules require a slot width between 3 and 4 mm wide -
suitable standard size metric router cutters are 3mm or 4mm and the standard inch sizes, 1/8 inch. I would
recommend using tungsten carbide bits rather than high speed steel - for the
amount of slot you have to cut the bit is doing more of an industrial than a
do-it yourself duty. Its well worth seeking out a specialist tool supplier for
the cutter(s) - DIY superstores tend to have a limited range of light duty
cutters - there are very good prices available from some of the mail order tool
companies. If you are using braid you will need to cut a recess either side of
the slot (see diagram H). Slot Depth 8mm minimum depth is
required by British
(BSCRA) rules, 9mm depth is required by International (ISRA) rules, so I'd
recommend 9mm depth.
It should be noted that proprietary plastic track slots are typically quite a
bit shallower and typically about 3mm wide. There's no problem
running cars intended for proprietary plastic track on wood tracks built to
BSCRA / ISRA specifications although some tweaking of the braid and guide height
may be needed for optimum performance, which of course is sometimes needed when
swapping between different makes of plastic track.
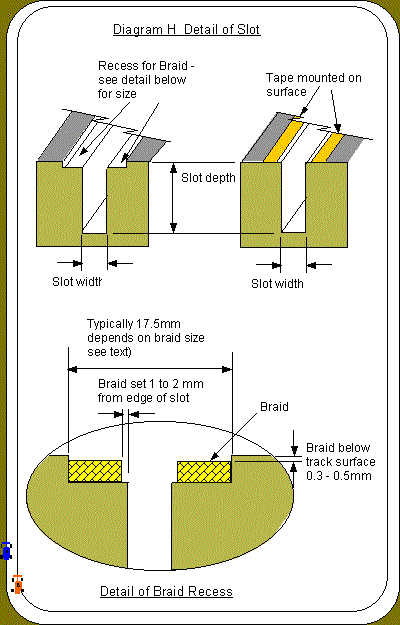
The size of the recess depends on the size of the braid - So I’ll give an example with typical sizes, but its wise to check the braid you’ve got, and adjust the size of the recess if necessary (I’ll come back to that under "Depth of Cut"). Track braid is typically between about 5.2 and 6mm wide when laid (the exact width depends on how much tension is applied when laying it) A 17.5mm (11/16 inch) diameter router bit with a pilot to fit in the slot is the easiest way of doing this (Some professional track builders have these specially made. In the past I have seen rebate cutter with a 17.5mm diameter and a 4.8 mm pilot in some catalogues, but unfortunately these seem to have been discontinued - and the pilot needed grinding down slightly to fit the slot). If the correct size pilot cutter is not available, the braid recess can be cut with a plain cutter using the guides etc. (If the plain cutter is less than the required width, you can make two passes to cut the necessary width.) Another type of jig for cutting the recess is shown on the track maintenance page.
Do tapes need to be recessed? The track surface will usually be painted between (but not under) normal surface mounted tapes, the thickness of paint may well be as thick as the tapes so they will end up something like flush with the surface. Hence most builders consider recessing the tapes is not necessary. (Recessed tapes require a recess the same width as braid, but obviously not as deep. I haven't tried this myself so in the absence of any real experience all I can suggest is that the top surface would be recessed about as much as braid.) This is intended to protect the tape better. The main problem with tape is damage on the side of the tape nearest the slot once the tape is no longer stuck down properly (due to thermal expansion). Keeping tape stuck down properly is a question of maintenance and not damaging the glue with excess solvent when tape cleaning. A recessed tape will be better protected from gear damage, but I think it will be just as vulnerable to guide damage. As I said I haven't built/maintained any tracks with recessed tapes so I cannot comment on whether it is much advantage over normal surface mounted tapes.
Guiding the Cutter
There are different ways of guiding routers. Numerically controlled routing machines can do an excellent job, but that's a tool for the professional builder (who won't be needing my assistance!). The options for DIY track builders are
1 Cut the corners with a Radius
arm and the straights with a straight edge acting as a Profile
guide.
2 Profile guides for the corners
3 Using the "Elliptical"
cutting method starting from an accurately made outside edge of the track
It is possible to build one track using a mixture of these techniques, but care is needed to get a smooth transition between them - particularly with the "elliptical" method where the distance between lanes is not constant.
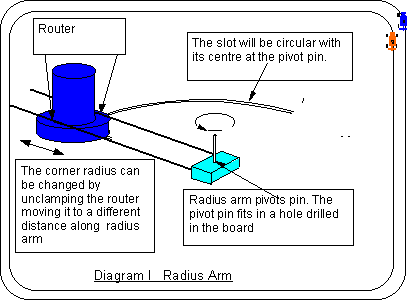
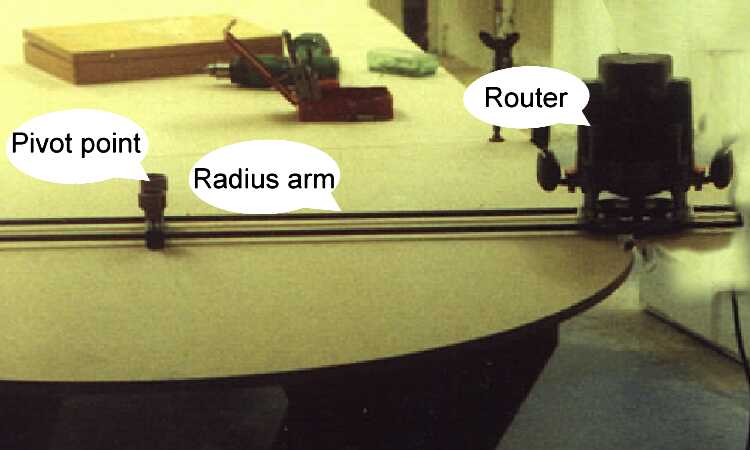
Most builders use a radius arm (see diagram I) for cutting the corners. This allows cutting of a constant radius corner, and is adjustable to any radius (up to a maximum obviously.) Routers are designed to work with a radius arm. They often supplied with a radius arm and almost invariably have the clamping points for a radius arm built into the router. Some standard radius arms are too short for the corner radii needed for slot car tracks, so you need to construct a larger arm. (I’ve never seen one that wouldn’t go to a much tighter radius than you’d ever need on a slot track.) They are usually intended to be simple to make, often consisting of standard size round bar. Follow the design of the original radius arm and it should be easy to work out how to make it make it longer! The radius arm pivots about a pin in the track. It is important that the pivot pin is a good fit in the pivot hole in the radius arm and the hole you drill in the track. (If you are making your own radius arm a 6mm pin is about the right size.) Generally radius arms locate the cutter very accurately. so there is no problem with aligning the router accurately enough to take several cuts. In theory it is better when taking several cuts to always feed the router one way (say clockwise), so any slight clearances are always taken up the same direction. Having said that, most people seem to get satisfactory results feeding both ways. If appropriate, cut the braid recess with the larger bit before changing the radius arm setting.
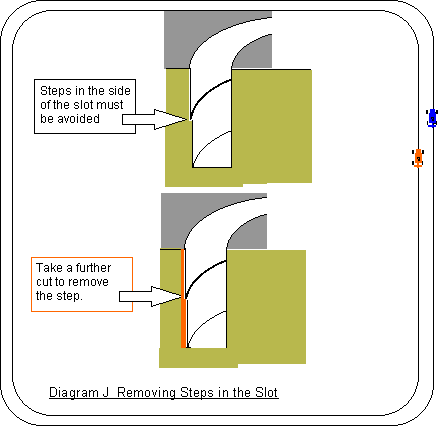
It is important to avoid steps in the side of the slot. Even a step the thickness of a few pieces of paper can upset cars particularly if its on the outside of a corner. Inspect the slot carefully when you’ve cut it. If there is a slight step, it can easily be removed by adjusting the radius to cut a vertical side to the slot in one cut (see diagram J). For reasons of clarity, the diagram exaggerates the thickness of the cut, only the smallest amount of material need be removed from the upper part of the slot. (As you are only cutting a fraction of a mm extra width, even the lowest power routers will cut the full depth at one go without distress)
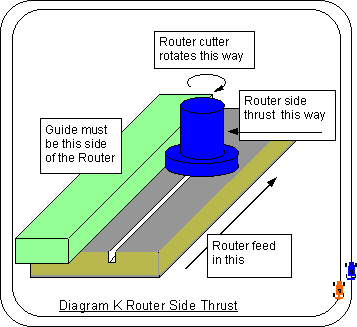
Straights are cut using a straight edge as a profile guide. A profile guide does not have to be straight, indeed its wise to check your straight edge really is straight. (The simplest way to do this is to look straight along the edge - slight bends are easily visible) Profile guides can be used for corners, these can be whatever shape you like, but you need a different one for each radius and each lane is a different radius. Unless you intend to build several tracks its probably better to stick with a radius arm for corners. A profile guide needs to be firmly clamped to the track surface. A profile guide only guides one side of the router, so it only works accurately if the router is firmly in contact with the guide all the time. Router cutting forces the router to one side (see diagram K), so its important to feed the router in the correct direction so that the router bed is always being pushed against the guide. (If you feed in the opposite direction it will tend to wander away from the guide).
It is also important not to let wood chippings build up against the guide as this can push the router off course. It is important to avoid steps in the side of the slot, so inspect the slot as you go and correct any steps as I’ve already described. If appropriate, cut the braid recess with the larger bit with the profile guide/ straight edge still clamped to the track surface. (Its usually easier to adjust the guide position slightly rather than start again once the guide has its removed). A well made router will have the bit exactly concentric with the bed, if its not exactly concentric make sure you always use the router at the same angle to the guide The sideways alignment of the braid recess with the slot does not have to be precise providing the braid is still set back from the slot edge. The car will not notice if the distance from the braid to the slot varies by 0.5mm /20thou, in fact some tracks have the braid slightly further from the slot on the outside of corners (where there is most risk of cars digging it up.)
On the finished track, the transition from the slot cut with one profile guide or radius arm position to another should be unnoticeable. Diagram L shows the correct geometry for a smooth transition between corner and straight.
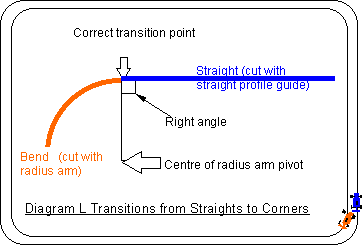
Work out where the smooth transition point is and mark it as the stopping point for the first cut. Next complete the slot up to the marked point. Place the guide or radius arm approximately in position for the next cut. Now place the router with the cutter in the end of the first cut and adjust the position of the profile guide, or the radius of the radius arm so that the cutter exactly fits in the end of the first cut. (You may need to turn the cutter by hand to make sure it is in exactly the right position.) Now mark the finish point of the second cut, make sure everything is clamped firmly in place - check again that everything is in the right place then take the second cut. You then proceed round the track repeating this process till you get to the last length of slot. With the last slot the router position needs to be set up at both ends, but otherwise the process is the same as above. I find it easier to make the last bit a straight (Its reasonably easy to adjust one end of a profile guide without moving the other end; playing around with radius arm centre positions and radii to get one end right without moving the other end is more difficult.)
If your track is built in sections bolt the sections together first, then cut the slots across the joints. That way the slots will be aligned perfectly across the joint when they are cut. When the sections are taken apart and bolted back together you’ll find out if the joint between the boards is really precise.
Elliptical cutting is an alternative way of jigging the slot cutting. This is used by many commercial builders. This is often referred to as "elliptical" cutting. It produces a blend from straight to the constant radius corner rather than the radius arm method which gives a straight followed immediately by the constant radius corner (The name "elliptical" cutting has stuck although it is not what a mathematician would recognize as an ellipse). This is described in more detail on a separate page
The slot must be a minimum of 8mm deep to meet British (BSCRA) rules, a minimum of 9mm deep to meet International (ISRA) rules. It is normal to cut a little deeper than this (0.5-1mm) so that any inaccuracy in the cutting depth doesn't matter, and so dust or very small bits of debris in the slot will not interfere with the car’s guide. Although the sideways accuracy of the slot is important, a little extra depth does no harm at all. The recess for the braid should be 0.3-0.5mm (10-20 thou ) thicker than the braid. Braid is often about 1.3mm (50 thou) thick, but its as well to measure the thickness of the braid you are using before cutting the recess. This will mean the top surface of the braid is recessed slightly below the track surface. You might think that having the top surface of the braid exactly flush with the track surface is a good ides, I've tried this and now think it was a good idea at the time but with the benefit of hindsight it was a mistake,. Flush braids are much more vulnerable to damage, particularly as the braid tend to "fluff up" a bit in use compared to the freshly glued down height. There are always likely to places where the recess isn't quiet as deep as you intended, if you intend to have the braids a little below flush, then small errors in the depth won't push the braid above the surface. All this means that the depth of the braid recess needs to be as accurate as possible, this takes some care. When cutting with a router dust builds up under the router bed and reduces the depth of cut. - This is more of a problem with MDF which produces fine dust when cut, and the dust can build up without being obvious. Chipboard cuts into larger wood chips which are more obvious, so its less likely you will fail to realise they need clearing away.
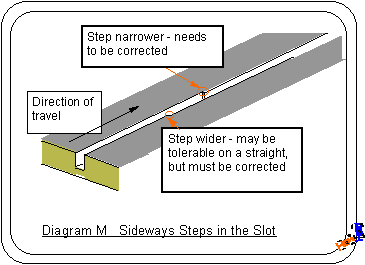
Having done your best to cut everything just right - what happens if its not perfect? If the distance between lanes varies by a couple of mm nobody is likely to notice - a step in the slot just a fraction of that size will cause trouble. So get your slots smooth, and if the lanes centres are slightly out don’t worry about it - adjust the next straight to get rid of the error before the next corner. If the slot steps sideways to get slightly narrower the cars will notice. If the slot steps slightly wider on a straight the cars will not notice. (see diagram M) Of course a step that's wider in one direction is narrower in the other, so if you are ever going to run your track in the reverse direction you will have a problem. On corners sideways steps are bad news either way round, although narrowing steps are much more serious.
So how do you correct a problem? A slight increase in slot width as long as it is smoothly blended in is no problem. Small imperfections can be corrected with a really sharp knife or chisel. Slightly larger imperfections can be corrected by re - routing. What about really big #*! ups? Using filler in the side of the slot and re- routing doesn’t usually work - the thin layer of filler usually crumbles when you rout it - however routing in a fresh piece of board should produce a repair as good as new. Cut out the relevant bit, let in a new piece of board, fill and smooth so as to provide a smooth surface and rout the slot - correctly this time!
| Back - The track surface | |
| Next - Painting and Braid | |
| Back to Track Building start page |
Copyright © 1999, 2000 and 2001with revisions in 2009, 2019 and 2023 C Frost All rights reserved
No liability is accepted for the information on this site or any use to which it may be put.