Track Construction-Part 3
Painting and Laying the Braid
Contents
Page updated March 2021
|
Track Construction-Part 3 Painting and Laying the Braid Contents
|
Page updated March 2021 |
Track Construction Part 1 described how to build the surface of the track. Track Construction Part 2 talked about the choice between tape and braid - you have to decide which at the cutting stage so you can cut the recess for braid (or not).
It is best to finish the carpentry before painting - and taping/braiding. Some cutting of the track surface is usually necessary for lap counters - either to produce an isolated pick up section or to insert optical detectors in the slot. When building a braided track its probably better to paint the surface first, then lay the braid. For taped tracks the tapes are often laid first, then the surface is painted, although you can paint first then tape if you prefer. The lane colours should painted on after the surface painting and braiding/ taping are complete.
Lap counters (and hence the start line) should always be where there is a minimum risk of counting errors. Generally lap counters work most reliably when the car is firmly in its own slot. Obviously it is possible for a car to be in the wrong lane on any part of the track, but on some parts of the track it will be relatively easy to observe which wrong lane it was in (and correct the scores).
The best place for the counters is usually at a medium speed position on a flat straight. Avoid places where the cars are likely to fall out, (e.g. corners) because you won't be sure if the car left the slot just before or just after the counters. Avoid places where the cars are likely to be up on two wheels (e.g. corners and just after corners) because the guide may be partially out of the slot. Avoid places where the guide may be lifting out of the slot (e.g. the top of hills, just after the top of hills, immediately after track joints, where cars will be on full acceleration from very low speed corners, or very high speed parts of straights). Lap counters will be covered in Part 4 of this series.
The track surface needs to be
painted with smooth paint between the conductors. I recommend smooth paint even
if you will be running Scalextric hard (not sponge) tyres.
One of the best surfaces is the track built for the 2019 ISRA World Championship
which uses a polyurethane top
coat applied with a fine pile roller. The finish is very fine
textured on which the grip builds well and tyre wear is
low. The paint they used was TEKNODUR
0050 - here's
a link to a UK supplier.Hard tyres will
grip well on a smooth surface, masonry paint may produce slightly more grip when
it is new, but the grip goes off fairly quickly and tyre wear is much higher.
The ideal finish is matt, a perfect "mirror finish" gloss isn't
desirable. Some fairly robust paint such as polyurethane is good. Some builders
now favor floor paints, the slightly rubberized texture can work well.
Emulsion paints are not satisfactory for BSCRA type racing. The colour is
a matter of personal taste - I've seen several tracks in anything from black to
off white , some shade of grey is most common - and looks reasonably near to the
colour of a real road.
Applying the paint
To paint under the braid/tape (or not?)
When using adhesive tape I recommend painting, or at least sealing the recess first. For the advantages and disadvantages of painting under the tape/braid when using impact adhesive see the separate section .
Paint can be applied by brush, roller or spray. One of the best surfaces uses polyurethane top coat applied with a fine pile roller. Brush painting does not require any masking, spray painting most definitely requires masking and rollers probably need masking. I leave you to decide if the extra time spent masking the braid recess or tapes is worth the time saved by not having to carefully brush paint all those edges. I’m assuming that any club with enough DIY skill to do the carpentry on a track will have plenty of experience of painting wood properly, so a full description is not necessary.
Tracks have to tolerate considerable changes in humidity, particularly as many tracks are housed in unheated rooms. This has led clubs to think about the best way to protect their tracks. Some clubs varnish/ paint the underside of their tracks to seal them. Tracks do tend to distort with age, some would say it is possible sealing the underside may reduce this. Some unsealed tracks show no signs of problems - short of having two tracks one sealed and one not in the same clubroom for some years it is difficult to know how to be certain if sealing the underside makes a significant difference.
I have been asked about painting the slot. I have seen each slot painted in the lane colour, and this is an interesting alternative to the normal stripe alongside the tape. Slots are sometimes painted just for sealing. There are tracks over 30 years old which do not seem to have suffered from not having the slot sealed.
The conductors (tape or braid) should be stuck to the track using either an adhesive transfer tape (such as 3M vhb F9469PC or F9473PC) or an impact adhesive (such as 3M Fastbond 10 or Evo Stick) . See the separate section for advice on the use of Impact adhesive
Adhesive Tape For Braid
Recently several tracks have been built using adhesive tape for braid fixing. Experience from the builders of these tracks is that it is a much cleaner, better and quicker job than impact adhesive. From the examples I've seen in use, the braid is in excellent condition, so there is much to recommend this in place of impact adhesive.
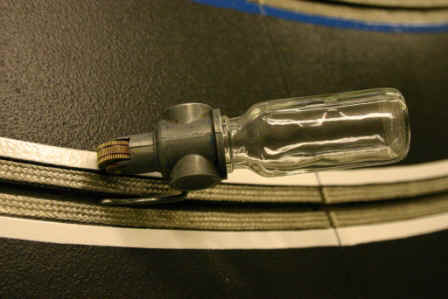
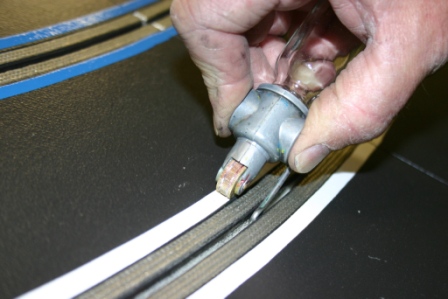
The photos below show the braiding of the Ecurie Barnton track in Edinburgh. The adhesive tape used is 3M vhb F9469PC. (3M vhb adhesive transfer tape comes in different thickness, F9469PC is 5 mil thick which a number of builders recommend , some builders recommend the 10 mil thick F9473PC where the braid is being bent such as at the end of track sections.) The tape comes in various widths, Barnton used 6mm wide tape. The photo on the left shows the tape being laid in the recess. The adhesive is very strong and is no appreciable thickness. It was very easy to lay even round tight bends. The backing paper is removed from the tape immediately before the braid is laid (right hand photo). The braid is then firmly applied to the track making sure the braid is stretched to the correct width of 6.35mm but not over stretched and pushed down with your thumb. I know some other builders would recommend using a piece of wood or roller to press the braid down – perhaps the Barton guys have strong thumbs!

Thanks to Pat Skene of Ecurie Barnton club for the photos and information.
Copper Tape - When this article was originally written excellent quality copper tape for slot car tracks was readily available from several UK suppliers. Unfortunately they have all stopped supplying it due to lack of demand and the only thing that seems to be available at present is copper tape from glazing suppliers. This stuff may be great for glazing but it is nowhere near as good for slot car tracks. The information on copper tape is now on a separate page. Unless / until a source of better copper tape can be found braid rather than tape is recommended
Braid
- Braid (unlike tape) is not under tension once laid - the braid just
settles at where its put. It is easier to lay braid accurately because there is
a recess in the track which defines its position.
Lubricants are usually used in braid manufacture, some residue
may well be present when delivered, so degreasing is recommended prior to laying
the braid. Typically this is done by immersing the drum of braid in a suitable
solvent such as brake cleaner and leave to soak, then run the braid onto a spare
spool, wiping with clean lint free rags as you re-wind. If you just soak
it, the fluid becomes contaminated, so when you leave it to dry, some diluted
oil is left on the braid. Just soaking is better, but not best. Make sure you observe the safety precautions recommended for
the degreaser you use.
The amount of tension
applied during laying can be adjusted to get an even top surface. Where
braid goes down under the track it usually needs pulling hard to prevent a bump.
In the middle of lengths it often needs hardly any tension, in fact if you pull
too hard the braid and get noticeably narrower. Always keep he braid to
the side of the recess away from the slot. Braid can be pulled up by contact
with the guide when a car deslots, braids last longer if they are (A) well glued
down on the edge nearest the slot and (B) there is a slight gap between edge of
the slot and the start of the braid. At the risk of stating the obvious,
this is particularly important on the outside braid in a corner.
In either case make sure the conductor is well pressed down into place after its laid. Its advisable to go over a freshly laid length of conductor several times to ensure it is pressed down fully.
At the end of sections take the end of the tape or braid down underneath the track as shown in diagram N. The power can conveniently be connected here.
Where the track doesn't come apart in sections, rout a sideways slot to take the conductor underneath the track. Lengths of tape can be joined by overlapping and soldering (the extra thickness off tape is small enough not to be a problem) The most satisfactory way to join braid is to route a sideways slot (see diagram O) and take the ends under the track.
I have experimented with ways of joining braid on the surface to avoid having to cut this extra slot - there are ways of joining braid without producing a bump, but I think they are more trouble than they are worth. It is also possible to feed power to the tape via a bolt going through the track surface - the bolt end is fitted flush with the track surface and the tape is then soldered on top, the wiring is connected to the protruding end of the bolt under the track. I don't think this would work with braid.
Magnetic braid and other methods of providing magnet traction are covered in a separate section.
The wiring is covered in part 5 of this series.
For marshalling purposes it is essential to clearly mark the lanes so that the marshals know which lane a car goes in. If its easy for the marshal to identify the lanes there will be a lower risk of mistakes - and that's good news for everybody! (I could also mention painting your cars so as not to camouflage the lane stickers - but that's really a subject for another article.) There are two ways of identifying lanes - colour is almost universal on club tracks - but you can use numbers. I’ve only ever seen numbers used on 8 lane tracks, but you could use them on other tracks. Lane stickers are the club’s responsibility - the standard ways of doing it are:-
| (a) PVC insulating tape of the appropriate colour cut into short lengths. |
|
| (b) Stick on paper labels of the appropriate colour (available from stationers) or white ones coloured with a marker pen. | |
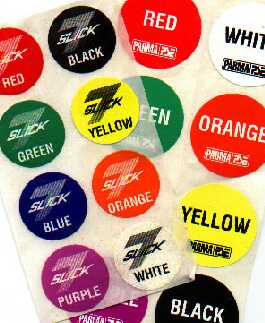
| (c) Pre printed colour lane stickers (such as those made by Parma, Slick 7 or JK) These are designed for 8 lane tracks, and come in sheets with one of each colour in the right order for the standard segmented sequence. | |
| (d) Printed number stickers - for tracks with lane numbers |
The lane colours or numbers are added once the surface is painted, If you are building an eight lane track there is a standard colour sequence as shown in the table - don't go confusing everybody by doing something different!
|
Standard 8 Lane Track colours |
|
|
|
Lane number |
Lane colour |
|
|
1 |
Black |
|
|
2 |
Purple |
|
|
3 |
Yellow |
|
|
4 |
Blue |
|
|
5 |
Orange |
|
|
6 |
Green |
|
|
7 |
White |
|
|
8 |
Red |
|
There is no standardisation in four lane tracks. It pays to give some thought to the lane colours. PVC tape for lane stickers is usually available in red, blue, yellow, green, black and white, so choose from these colours. Make sure the colour stands out from the track surface - don't use black on a black track! It can improve recognition slightly to have alternate light and dark colours, and in some circumstances blue and green can be confused. The colour should ideally be painted in a continuous stripe alongside the braid/tape, or by painting the slot lane colour. There is a recent trend towards just painting the slot as this doesn't interrupt the textured track surface . A pin striping tool is the best way to produce a continues stripe.
 |
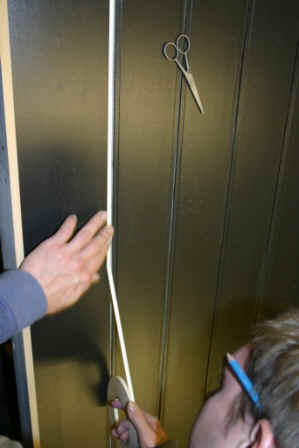
If you are painting a stripe on the track surface, a pin striping tool is the best way of marking the lane colours. Here is an example in use on the new Ecurie Barnton track. Thanks to Pat Skene for the photos. |
Another approach is to paint the slot lane colour. Shorter paint markings can be used, although if there is too much of a gap between them, this can cause a slight delay while the marshal works out which lane is yours!
Lane numbers are painted on to the track surface in appropriate places. Obviously they should be in contrasting colours - white on a dark track, black on a light one. The numbers are usually about 25mm (1 inch) high. A stencil is needed to do a decent looking job (Even if somebody can do concourse standard hand painted numbers they are likely to get bored after a couple of corners and it’ll look a bit of a mess by the end of the lap!) The numbers need to be in all the places where cars may have to be marshaled - this is a lot of number painting if you are going to avoid marshalling delays while the marshal searches along the track for a lane number.
When racing over a fixed length of time, the distance covered has to be recorded. It has become pretty much universal to record laps and hundredths of a lap, although years ago there were a few tracks marked in other fractions of a lap. Right from the start of organized racing, the fractions of a lap were marked on the track so the finishing position could be read from where the car stopped when the power was turned off at the end of the race. Quite a few tracks have the start line and the lap counters on different parts of the track. As long as the 1/100 of a lap are marked from the counters NOT the start line that works fine.
There are two standard ways of marking the fractions, constant distance and radial. The difference can be seen in the diagram below.
With the constant distance method, all the hundredths are the same length. Thus when cars are apparently alongside one another, the car on outside lane of a bend has traveled more hundredths than the car on the inside. In the diagram it can be seen that half way round the S bend a car that has reached 8 on the outside lane will be alongside a car that is between 4 and 5 on the inside lane. In a conventional layout with equal lap lengths, this all cancels out by the end of the lap and the cars cross the finish line side by side they are both on 100 hundredths of a lap (which of course is 0 hundredths of the next lap).
With the radial method, if cars are side by side they will always be on the same hundredth. This is achieved by dividing the center line of the track into equal length hundredths of a lap, then taking radial limes on the corners as shown in the diagram. Thus the hundredths of a lap on the outside lane of a bend are longer than those on the inside lane.
So which is right and which is wrong? Either is generally considered acceptable, there are plenty of examples of each around the country. In the early days of organized racing the majority of tracks used the constant distance method, in more recent years the there are probably a small majority of tracks use the radial method. How can you decide which you prefer? If you race evenly matched cars side by side on the outermost lanes, the car on the inside has a slight advantage which it looses when its on the outside so the cars lap in identical times. Usually the inside lane advantage is quite slight, much less than the advantage the constant distance method indicates, but not no advantage as the radial method indicates. So arguably neither is perfect, it comes down to personal choice.
|
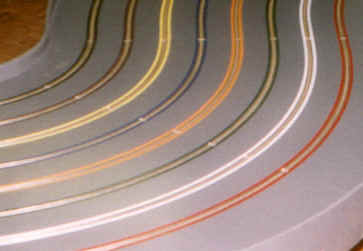
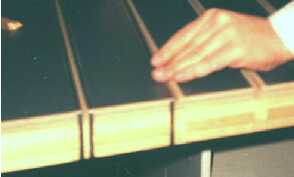
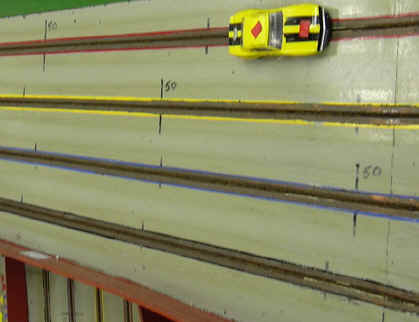
The hundredths of a lap are marked by the transverse yellow lines on
each lane.
This track (left) is an example of radial marking, but the markings are painted on in the same way for either method. Numbers are marked to for ease of counting - just writing 05, 10, 15 etc is often considered sufficient, although a few tracks do have a number marked for every hundredth. With radial marking the numbers can be written on the barriers either side of the track and it's obvious which line they refer to. |
|
This track (left) is an example of constant distance marking.
With constant distance marking it is sometimes necessary to mark numbers on the track surface to make clear which is which. |
Chris Frost
| Back - The track surface | |
| Back - Cutting the Slot | |
| Next - Lap Counters | |
| Magnet Traction | |
| Back to Track Building start page |
Copyright © 1999 to 2021 British Slot Car Racing Association All rights reserved
No liability is accepted for the information on this site or any use to which it may be put.