Track Construction-Part 3a
Painting and Laying the Braid / Tape with impact adhesive
See part 3 for laying using Braid / Tape using adhesive tape
Page updated January 2012
|
Track Construction-Part 3a Painting and Laying the Braid / Tape with impact adhesive See part 3 for laying using Braid / Tape using adhesive tape |
Page updated January 2012 |
Track Construction Part 1 described how to build the surface of the track. Track Construction Part 2 talked about the choice between tape and braid - you have to decide which at the cutting stage so you can cut the recess for braid (or not)..
To paint under the braid/tape (or not?)
Do you paint where the
tape/braid
will go, or stick the tape/braid direct to the board? I've seen
very
satisfactory results with either method when using contact
adhesive.
However, when using adhesive tape I recommend painting, or at least
sealing the recess
first.
Impact adhesives will stick the tape/braid to the bare board pretty
well - sometimes
too well for the well being of the board ! Are you thinking of
sticking
the tape/braid to a painted surface? It is important to check that the
glue you are using is compatible with the
paint - some combinations of paint and adhesive don't bond properly so
I'd recommend
doing a small test piece first.
Painting the recess is a good precaution against the MDF delaminating. With impact adhesives delaminating doesn’t seem to be as much of a problem, possibly because this type of adhesive soaks further into the MDF than adhesive tape.
Perhaps I should explain
further......
In most cases, when first applied, the adhesive bond to bare board will
be stronger
than the bond to a painted surface. At first you'd think that a
stronger
bond is better - that's true if the the tape or braid never needs to be
replaced. Yes but..... the tape or braid sometimes does
need to be
replaced, and when it does you don't want it to come away without
damaging the underlying
board. The braid recess is normally deep
enough to remove the hard outer surface of the board and expose the
softer inner
layers of the chipboard or MDF. There are considerable variations
between
boards. With chipboard the internal particles may not be that
well bonded
together, so trying to remove freshly laid braid can pull particles of
board
away from the surface of the recess. With MDF the internal layers
may not
be that well bonded together, so trying to remove freshly laid braid
can pull a paper
thin layer of board away from the surface of the recess (and a paper
thin layer
really doesn't matter)
or cause several layer to delaminate (which does matter!). Several
layers
delaminating is a feature of less dense / lower quality MDF. Painting
the
recess may help a little in sticking the board together, and may reduce
the
adhesive bond strength so that when trying to remove freshly laid braid
the
adhesive bond fails before it rips the board apart.
Over time the adhesive bond is weakened, the use of solvents for track cleaning is one of the main reasons it weakens. When this happens the bond between the tape/braid fails first, and a layer of adhesive remains on the track. Thus old tape/braid is most unlikely to be stuck down well enough for it's removal to do any harm to the underlying chipboard/MDF.
.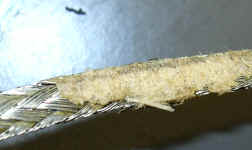
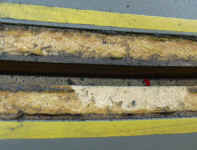
Above - An example of braid removed from track after about 2 years in use where the surface braid recess was not painted. This track used good quality MDF, and a paper thin layer of MDF has come away with the braid. Note that the majority of the recess is covered in the old glue (darker colour than the MDF) which will need to be removed prior to laying the new braid.
To summarize - Assuming the glues and paint are compatible, painting the braid recess sounds like a good idea unless you've got really good quality board. With really good quality board. There's probably some advantage in not painting under the braid. It's probably better not to paint under tape.
Applying the paint
Laying the Tape or Braid with Impact adhesive
The conductors (tape or braid) should be stuck to the track using either an impact adhesive (such as 3M Fastbond 10 or Evo Stick) or an adhesive transfer tape (such as 3M vhb F9469PC) . This section deals with
Impact adhesive
I found a liter of Fastbond 10 was plenty for a 4 lane track with 107 ft. (33 m.) lap length, so don’t buy a 5 litre tin unless you’ve got a use for the rest of it! Always read the instructions and observe the safety precautions! Adhesives work best on clean, grease free surface. OK, there's rarely much oil or grease on MDF, but there may well be some lubricant left over from the manufacturing process on the braid. Ideally you should remove any traces of oil of grease from the braid with a suitable solvent (yes I know people often don't bother, but it can help your braid to stay stuck down a bit longer). There is certain to be a lot of dust generated by cutting MDF, so make sure you remove loose bits and dust (preferably with a vacuum cleaner) before trying to stick anything. This advice is doubly important in repairs where the old adhesive needs to be removed first. If you buy Evostick in tubes, apply it straight out of the tube. Adhesive from tins needs to be decanted into a squezable plastic bottle with a small nozzle (an old well cleaned goop bottle is fine). Once out of the tin the adhesive soon dries up in a plastic bottle, so if you are not going to use it in the next quarter of an hour, put your "goop" bottle inside a screw top glass jar to keep the solvent in. Incidentally if you think this use of old goop bottles is a bit crude and the professionals must have a better way, Steve Ogilvie tells me he uses an old squeeze mustard bottle for this job!
|
|
|
 |
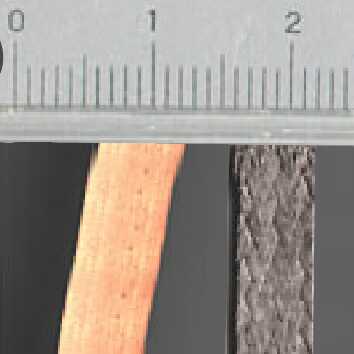
| Applying adhesive ready for braid | Tape (left) and Braid - both about 6mm wide |
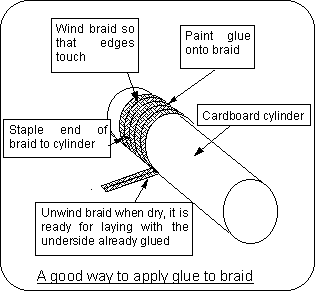
A good way to apply glue to braid is shown in the diagram above right. This is a technique Hasse Nilsson was shown at Southend (Wonderland Raceway) about 30 years ago and he‘s used it ever since. Here’s how it works – Staple the braid to a cardboard cylinder at one end. Wind the braid round the cylinder so the edges are just touching. Staple the other end of the braid to the tube. Coat the braid with contact adhesive using a paint brush. When dry, remove the staple at one end and it’s ready to lay.
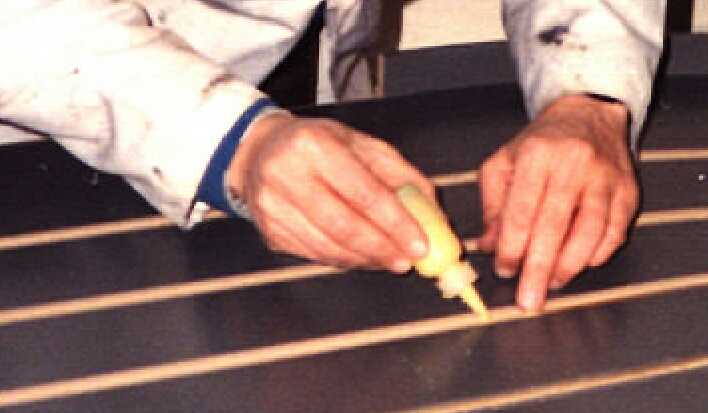
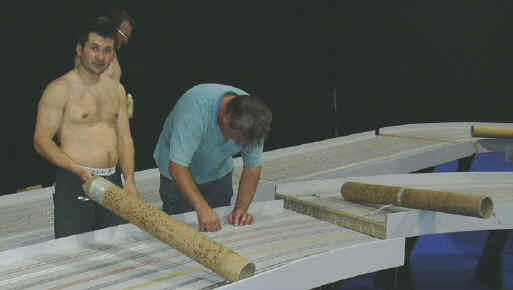
Below - a picture of this technique in use on the BSCRA "UK8" track - Hasse Nilsson (right) is laying braid (on the hottest week end on record).
Avoid ancient tins or tubes of adhesive - it doesn't work as well when it's well past is sell by date or when its been opened too often. Adhesive spreads better when its not too thick; braid is more robust if the adhesive runs in between the strands and holds them together. With press on tin lids, one way to reduce the risk of the contents setting in the tin is to stand on the lid to make sure its shut, the turn it upside down to make sure the lid seals before storing it right way up. While we are talking about impact adhesives - the bond will fail if its immersed in solvents such as lighter fuel or white spirit. So go easy on the solvent when cleaning the tapes!
Apply the adhesive and spread it to an even film to both surfaces - always apply the adhesive the board second (its much more porous than metal so the adhesive dries quicker.) When the adhesive is touch dry press the conductor onto the track.
Tape / Braid Laying
Tape and braid are layed in same way as when using adhesive tape - see Track Construction-Part 3
Chris Frost
| The track surface | |
| Cutting the Slot | |
| Lap counter position | |
| Laying using Braid / Tape using adhesive tape | |
| Feeding in the power and lane colours | |
| Magnet Traction | |
| Back to Track Building start page |
Copyright © 1999 to 2007 with minor changes 2010-2012 British Slot Car Racing Association All rights reserved
No liability is accepted for the information on this site or any use to which it may be put.